An Opinionated Guide to Neovim
Updated September 5, 2023

Neovim! You’ve heard this editor praised so many times that you searched for it on a search engine, installed it, and then quickly uninstalled it shortly after.
Yep, that’s a very common experience when using Neovim, despite it winning the title of the most loved editor for two years in a row according to the StackOverflow Survey.
I still think the reason why it won is that Neovim has such a hard-to-enter barrier. Only people who love Neovim use it. Most people who try it uninstall it within 5 minutes and just use other alternatives. It’s a love-or-hate, nothing-in-between situation.
The number one reason why people don’t use it is that a fresh install of Neovim is “unusable” for programming, lacking common programming features like LSP for autocompletion.
It truly makes you wonder why some people use Neovim when there are better alternatives.
Or, are there?
I have been using Vim/Neovim since 2016 for programming or anything text-related, and I don’t feel like changing my text editor anytime soon because it’s just that good if you know how to get around it.
In this article, I will guide you through your Neovim journey in the easiest (and least painful) way possible. By the end of this article, you will have a fully configured Neovim without the pain and a grasp of the concept of modal editing. And then, you will decide whether Neovim is for you or not.
Keep in mind that this guide is very opinionated.
What is Neovim?
If you haven’t heard of Neovim, it is a modern take on a popular text editor, Vim. The difference between Neovim and other common text editors like VSCode is that Neovim uses modal editing, which makes the text editing experience fast, ergonomic, and fun too!
Neovim is highly customizable through configuration. But, configuring Neovim can be absolutely painful. Following those basic online guides out there is also not very helpful.
You want an editor that just works so you can do things that matter. But… there’s so much to configure, so much pain.
I have laid out this guide specifically for those of you who want to get a “usable” Neovim quickly running without much nonsense.
1. Install Neovim
To install Neovim on your system, use your preferred method from this guide.
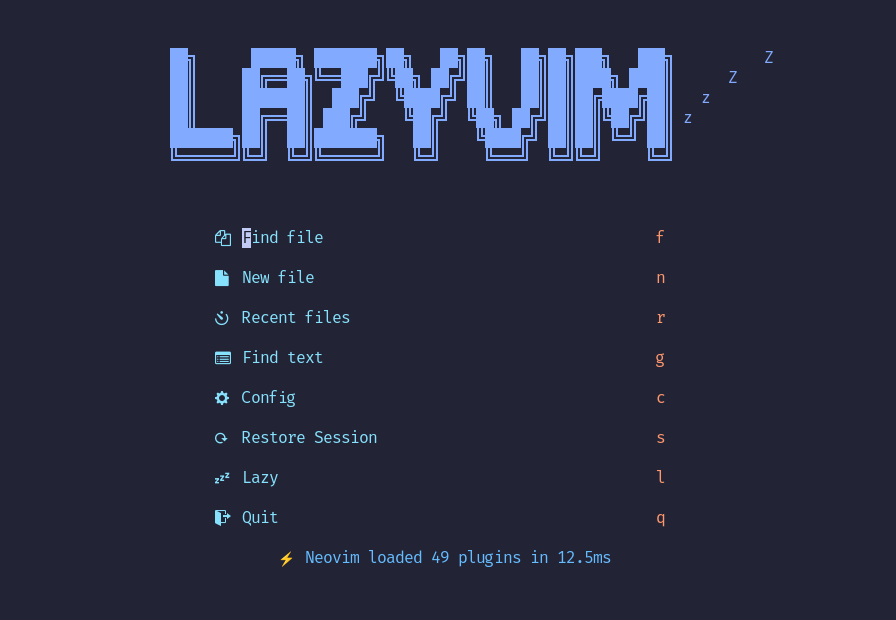
2. Install LazyVim
LazyVim is a config preset for Neovim. Without this, your Neovim just looks ugly and lacks features.
You might have heard people saying that you should start Neovim from scratch, but I disagree with that statement. I’ve been writing my config from scratch for years. But now, I’ve completely moved to LazyVim because it provides sane defaults without sacrificing customizability.
For a new Neovim user, this is absolutely recommended.
So, go ahead and install LazyVim.
Make sure you’ve properly installed it by running it. From your terminal, run:
nvimIf your terminal looks something like this, then you have it working.
Press q to quit. We will go back to Neovim later.
3. Setting key repeat (Recommended)
Although this is optional, it will make your navigation in Neovim much quicker.
When you hold down a key, usually, your system will repeat the keypress for that key at some particular rate. For example, when you hold down w key for a while, it will input wwwwwwwwwwwwwwwwwwww.
We need to ramp up those rates because the default is not fast enough.
In Linux, this can be easily set with:
xset r rate 250 60

# If you want to reset it
# xset r rate 500 25
What it does is setting the key repeat to be active after holding for 250ms at 60 repeats a second. I personally use this setting.
For Mac users, use this guide.
For Windows users, I kindly suggest seeking resources specific to your OS to achieve the same task.
4. Modal Editing in Practice
Now let’s open the tutorial file with Neovim:
nvim /usr/share/nvim/runtime/tutor/en/vim-01-beginner.tutor

# For Windows
nvim C:\Users\YOUR_USERNAME\AppData\Local\nvim\runtime\tutor\en\vim-01-beginner.tutor
Now try pressing j.
How about holding j?
As you can see, j is the key to make the cursor move down.
Press k to move the cursor up.
l to move right. h to move left.Congratulations! Now you can navigate code without using the mouse.
The next step is to actually complete the lessons. Before you do that, please keep this in mind:
| Key | Description |
|---|---|
| u | Undo |
| Ctrl+r | Redo |
| Escape | Go back to normal mode. If you press a key and Neovim does something that you don’t expect it to do, press this first |
| Spaceqq | Quit without saving |
There are several lessons you need to skip because they are either unimportant, too difficult for beginners, or they don’t align with LazyVim bindings. Here is the list:
- Lesson 1.2: EXITING NEOVIM
- Lesson 1.6: EDITING A FILE
- Lesson 4.1: CURSOR LOCATION AND FILE STATUS
- Lesson 4.4: THE SUBSTITUTE COMMAND
- Lesson 5.1: HOW TO EXECUTE AN EXTERNAL COMMAND
- Lesson 5.2: MORE ON WRITING FILES
- Lesson 5.4: RETRIEVING AND MERGING FILES
- Lesson 6.3: ANOTHER WAY TO REPLACE
- Lesson 6.5: SET OPTION
- Lesson 7.2: CREATE A STARTUP SCRIPT
- Lesson 7.3: COMPLETION
5. Conclusion
Now that you’ve completed the tutorial, you finally have a grasp of what editing using Neovim is actually like.
Note that this is basically the tip of the iceberg. There’s nothing wrong with staying at this level, but if this short tutorial piqued your interest in Neovim, you can visit these links below for more resources: